Dashboard
Configuring and managing versions
Contents
Overview
This page provides a detailed look into advanced options available when creating and configuring versions of your SPS applications. Refer to this page to learn how to quickly create a default version with minimal configuration required.

A Version is the direct translation of your UE project. Versions are created either from a container image or uploaded from a compressed .zip UE project. You can deploy multiple versions under the same application, however, only one can be active at a given time. You can further customise the version settings, such as the resolution of your stream, the frontend it uses, etc.
Multiple versions will nest under the same application, which controls their configurations, allowing you to easily create new versions of your application whenever you update your container image with a new UE build. You will be automatically requested to create a new version as part of creating a new application.
Navigate to the Versions section of the side menu to view the version summary table. It provides insights into the most important information about your versions on the cluster:
- A list of all versions that exist on your cluster accompanied by their current status (e.g.
Ready,Active,Uploading) - Parent application of each version with hyperlinks;
- Platform (Windows or Linux) that the version is running on;
- HTTP and TURN configuration of each version.
The Actions dropdown allows you to view details of each version and duplicate or delete them. Note that versions cannot be edited after they are created, so if you require to change any configurations, you will need to create a new version. If you only require small changes the easiest way to achieve this is to duplicate an existing version and make the required modifications.
Version Configuration
The easiest way to create a new version is to navigate to the Applications menu, select a desired parent application from the list, and choose Create version from the actions dropdown.
You can now specify the version’s advanced configuration, which is described in detail below.
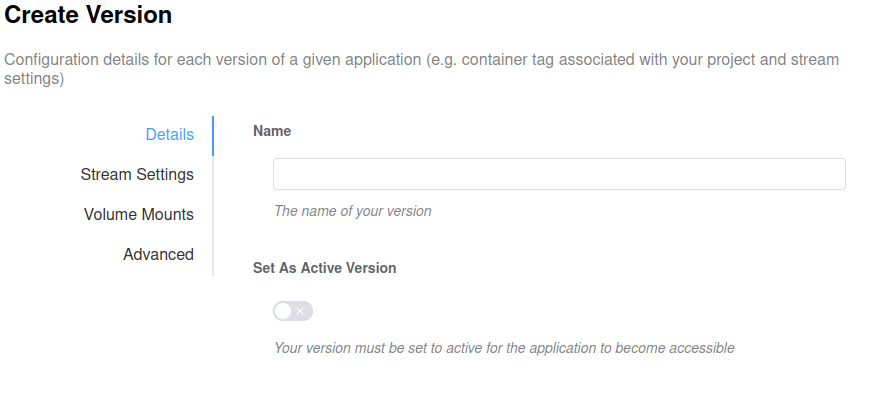
Details
Name: Mandatory field for your version’s name. It may only contain lowercase alphanumeric characters and dashes, must be at least 2 characters long and at most 20 characters long.
Set as active version: Check this toggle if you would like this version to be automatically set as the active version of its parent application after it’s created.
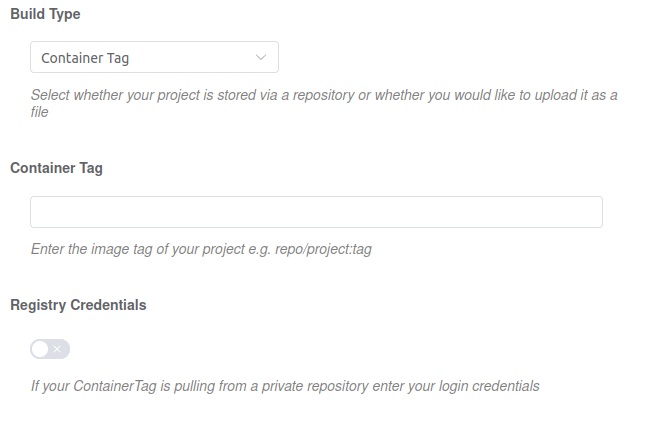
Build type: Select whether you would like your version to be created from a container image or directly from a compressed .zip UE project. Note that the second option is only available on select cloud platforms (currently only on AWS).
If you’ve selected Container tag as the build type, enter the following information:
Container tag: Insert your container image tag in the following format: my_registry_user/my_repo:my_tag.
Never use latest as a tag on CoreWeave and instead always push images to a new tag. Due to aggressive caching for faster repeat spin-up times, re-using the same tag can lead to some of your pods running an out-of-date version of your container.
If your container tag is private, then click the Registry credentials toggle and enter the access details:
Registry: The index of your container registry, for example https://index.docker.io/v1/.
Username/Password: Your container registry username and password. Note that if the container tag is public, then the credentials fields will be ignored.

If you’ve selected Upload file as your build type, then either drag-and-drop or click-to-upload your compressed .zip UE project. Note that depending on the size of your application, uploading a version can take a significant amount of time.
Stream Settings
Note that all streams will default to 1920x1080, so if you require a different resolution, you must change the parameters below or send them as launch arguments to your instance.
X: Sets the horizontal resolution of your streamed instances window.
Y: Sets the vertical resolution of your stream instances window.
Volume Mounts
Volume mounting allows you to attach additional resources to the instance that will be accessible by other pods. Read more about persistent volumes and shared storage here. Note that creating and managing volume claims as well as their associated costs is entirely the user’s responsibility.
Name: The name of your volume mount used during the creation of the persistent volume claim.
Mount Path: The path inside your running instance that you wish to mount your volume to.
Make Volume Read-Only: Enable this toggle to prevent instances from writing to the volume.
Frontend
Enable HTTP Server: HTTP server is enabled by default. Turn this toggle off if you would like to point your own frontend at the SPS web socket.
Container: Insert your container image tag containing the custom frontend in the following format, your_user/your_repo:your_image_tag, and your respective repository details if the container is private.
Advanced
Enable TURN Server: TURN server is enabled by default and is used for relaying the traffic between peers. Turn it off if your network is not behind a NAT gateway to use a STUN server instead.
Send WebRTC Offer From Browser: By default, the WebRTC offer to exchange ICE candidates and establish a connection is sent from the browser. Disable this toggle to, instead, have it sent from the UE application itself. Note that this feature is only supported for Unreal Engine version 5.0 onwards.
Command Line arguments: Set any additional command-line arguments you want to pass through to your instance.
Environment Variables: Set any additional environment variables to pass through to your instance.
Once happy, click the Create version button. Versions cannot be edited at a later stage, so if you need to make any changes, you will need to make a new version.
Do not refresh or navigate away from this page while the version is created. Depending on the size of your project and your connection speed, creating a version can take some time, especially if you are uploading a compressed UE project.
When the version is created and set as active, you can use its parent HTTP endpoint link to distribute it to your consumers who will be able to spin up instances on demand by simply following the link.
Version Actions
After your version has been created, it will appear in the both the version summary table, and the application version details. In both locations you can interact with it via the Actions dropdown. Select one or multiple versions via the checkbox next to their name and select via the dropdown the required action:
View details: Navigates you to the version summary page where you can view its current configuration, and all its running instances.
Duplicate version: Navigates you to the version creation screen and duplicates the configuration of the selected version. The new version name will be appended with a copy suffix, which can be changed at this stage.
Delete version: Deletes all selected versions and terminates any running instances.
