Getting Started
Deploying your SPS application
Contents
How does my Unreal Engine project translate to SPS?
Scalable Pixel Streaming is structured around the concepts of application, version, and instance. In this section, we will explain how these entities relate to your Unreal Engine project.
- An application is the high-level configuration that governs how your UE project is streamed and accessed. The application is not directly linked to a specific build of your UE project, but the configuration selected at this step will apply to all deployed versions of your UE project. At the application level, you can customise the cloud resources associated with a deployment (e.g. RAM / GPU / CPU), the connection options, and optional components such as a custom domain.
- A version is the direct translation of your UE project. Versions are created either from a container image or uploaded from a compressed
.zipUE project. You can deploy multiple versions under the same application, however, only one can beActiveat a given time, e.g. you could deploy a new version to reflect an updated build of your UE project. At the version level, you can customise the resolution of your stream, the frontend it uses, etc. - An instance represents an individual streaming session. Users spin up instances on demand by clicking the URL endpoint for an application with an
Activeversion, and these are subsequently terminated when the user disconnects.
There are several ways to deploy your UE project with SPS, ranging from a web dashboard to REST API calls. Choose the method best suited to your needs:
- Deploy via dashboard — you can use the dashboard provided with your SPS installation from any web browser to deploy new applications as well as view and manage all existing ones;
- Deploy via command-line tool — you can use the CLI tool we provide to deploy applications directly from the command line without needing to access the dashboard;
- Deploy via REST API — you can send curl requests or scripted calls directly to the SPS REST API to manage your applications and deploy new ones.
Deploying via dashboard
We provide a Scalable Pixel Streaming dashboard as a convenient way of managing your applications and their versions. Refer to this page for a more detailed look at advanced application configurations, versions, and other dashboard features.
Logging in to the dashboard
Your cloud installation will list your dashboard URL and access key in its outputs. Navigate to your dashboard URL and enter the REST API access key into the provided input field:

Read more here if you cannot locate your dashboard login details.
Creating an application
1. Navigate to the Application section of the menu and click Create Application:

2. Enter your desired application name in the Name field. Leave all other fields at their default values unless you want to customize your application. Once happy, click Continue to version. You are now ready to create a new version for this application.
Creating a version
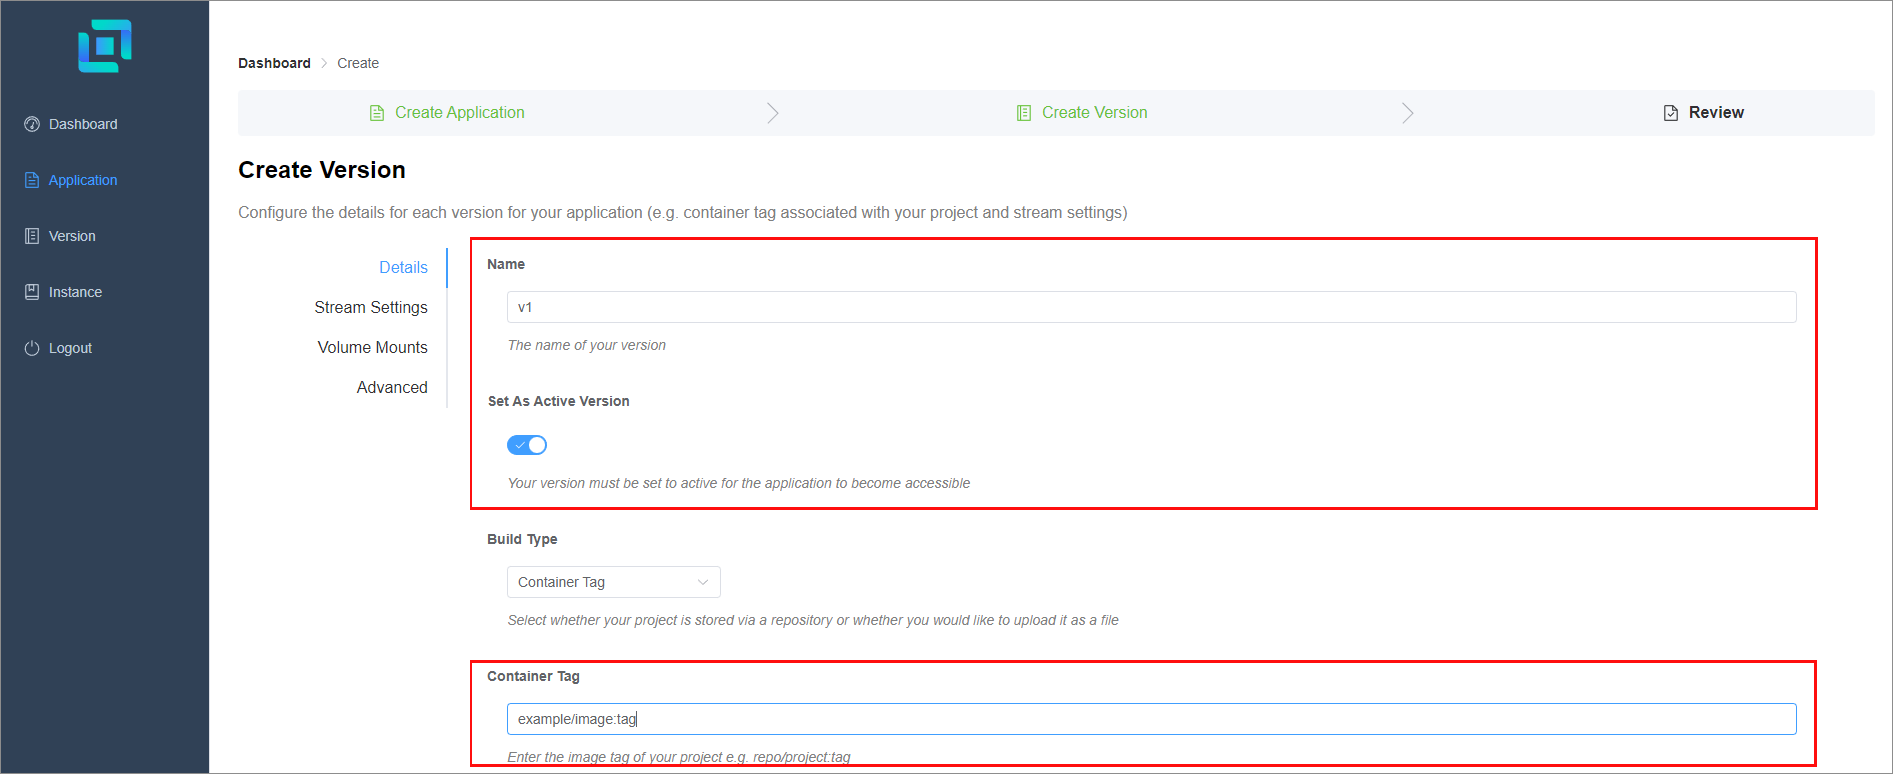
1. Enter a desired Name for your version.
2. Check the Set As Active Version toggle.
3. If you are creating the version from a public container image, enter its tag in the respective field in the my_registry_user/my_repo:my_tag format:

4. If you are creating the version from a private container image, check the Registry credentials toggle and enter your registry index, username, and password.
5. If you are creating the version from a compressed .zip Unreal project (currently only supported on AWS), change the Build Type to Upload file, then either drag-and-drop or click-to-upload your compressed project.
6. Click Review and confirm the version settings.
7. Click Confirm and wait for the version to be created.
Do not refresh or navigate away from this page while the version is created. Depending on the size of your project and your connection speed, creating a version can take some time, especially if you are uploading a compressed project.
Launching an instance of the application
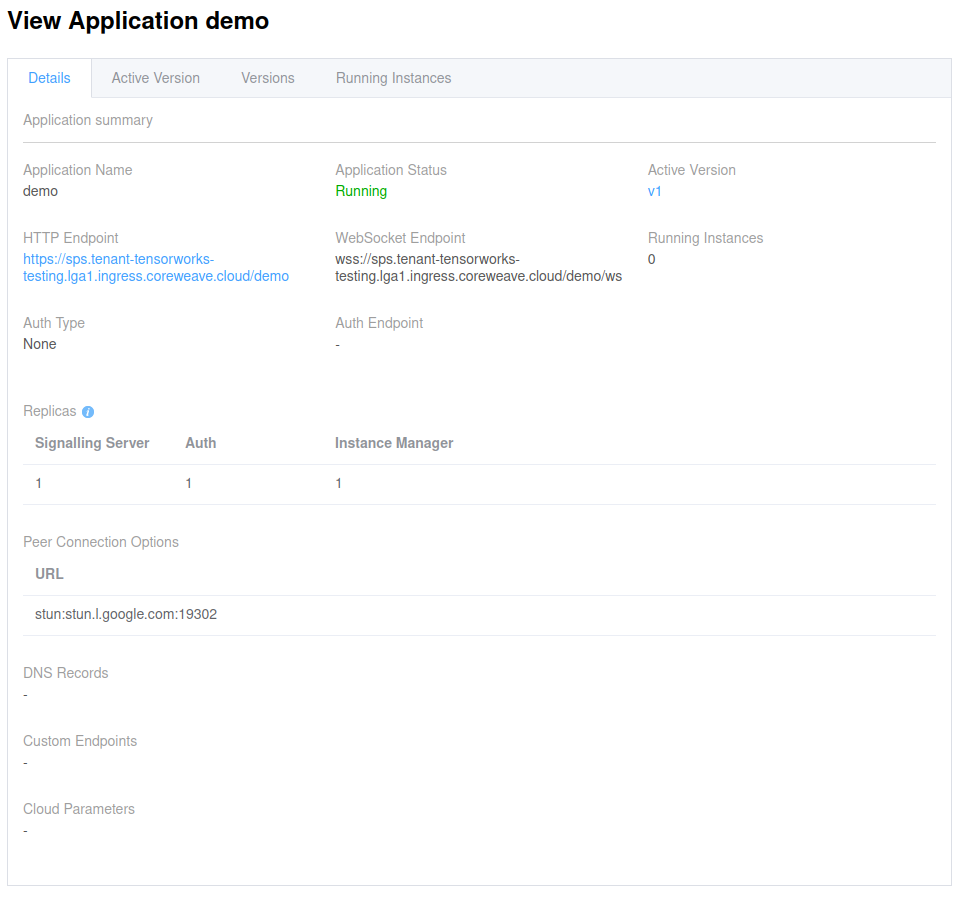
When the version has been created, you will be redirected to the View Application page, where its HTTP Endpoint URL will shortly become available.

You can now use and distribute this link to launch instances of your application and see it in action.
Note that your HTTP endpoint URL by default is public, so anyone with the link can access your application. To restrict the link, you need to configure OAuth or a custom athentication mechanism
Managing your applications and versions
The dashboard allows you to easily create new applications and new versions, edit the existing ones, and fine-tune their configurations at any point. Explore this guide when you are ready to take your deployments to the next level.
Quickdeploy via CLI tool
We provide a CLI tool that allows users to automate and streamline their deployments. This section covers how to quickly deploy applications from the terminal. The full set of commands and features for the CLI tool is described in detail in the CLI client section.
Download the CLI tool
Download the client for your operating system and CPU architecture:
- Linux (64-bit Intel/AMD)
- Linux (64-bit ARM)
- macOS (Intel)
- macOS (Apple Silicon)
- Windows (64-bit Intel/AMD)
- Windows (64-bit ARM)
For Linux and macOS, you must allow the downloaded binary as executable:
chmod +x ./sps-clientConfigure REST API access details
Execute the following command to add your REST API server to the tool, using your REST API endpoint URL and access key details, which are listed as outputs in your cloud platform SPS installation:
sps-client config add --name "your_desired_server_nickname" --address "your_endpoint_url" --access-key "your_access_key"
Quickdeploy your application from a container image tag
To create a default application and assign a version from a public container image to it, execute the following command, supplying the container tag in the following format:
sps-client quickdeploy --tag "your_user/your_repo:your_container_tag"
To create a default application and assign a version from a private image to it, modify the command with your registry index and access credentials. Note that the username must be entered in lower case:
sps-client quickdeploy --tag "your_user/your_repo:your_container_tag" --registry "your_registry_index" --username "your_username_lowercase" --password "your_password"
When the process is finished, the CLI tool will output a URL that can be used to create instances of your application — simply follow the URL in any browser to see it in action.
Quickdeploy your application from a .zip compressed Unreal project
Instead of creating an image via the Image Build tool, you can directly deploy a version from a compressed .zip UE project if your target cloud platform supports this deployment method (currently only on AWS). You can easily do this by executing the archive command as follows:
sps-client quickdeploy --archive "path/to/your/archived/packaged/Unreal/project.zip"
Note that, depending on the size of your project and the speed of your connection, this command can take a while to execute. When the process is over, the CLI client will output a URL that can be used to create instances of your application — simply follow the URL in any browser to see it in action. Note that a .zip upload creates a new container tag every time, so you won’t be able to reuse an existing tag with this method.
Deploying via REST API
You can send requests to manage your SPS formation directly to the REST API endpoint. Detailed information on all capabilities of the REST API is here. To access the dynamic API reference, append your endpoint URL with /api/docs.
Creating a new application
This POST request will create a new SPS application:
curl -X POST \
  -H "Content-Type: application/json" \
  -u admin:<your_rest_api_access_key> \
  -d "{\"name\":\"<your-application-name>\"}" \
  http://<sps-your-endpoint-url.com>/api/v1/application
Creating and assigning a new version to the application
This POST request creates a new version for your above application from a public container:
curl -X POST \
  -H "Content-Type: application/json" \
  -u admin:<your_rest_api_access_key> \
  -d "{
        \"buildOptions\": {
            \"input\": {
                \"containerTag\": \"<full-path-to-your-container-tag>\",
                \"type\": \"imageTag\"
            }
        },
        \"name\": \"<your-version-name>\"
    }" \
  http://<sps-your-endpoint-url.com>/api/v1/application/<your-application-name>/v1/versions
This PUT request makes the newly created version active:
curl -X PUT \
  -H "Content-Type: application/json" \
  -d "{\"name\":\"<your-application-name>\", \"activeVersion\":\"<your-version-name>\"}" \
  -u admin:<your_rest_api_access_key> \
  http://<sps-your-endpoint-url.com>/api/v1/application/
