Tools and software
Shared storage
Contents
Overview
User is responsible for creating and managing the lifecycle of all persistent volume claims.
Shared storage in Scalable Pixel Streaming allows multiple applications to access and use the same storage resources simultaneously, which is essential for applications that require data consistency across instances. Scalable Pixel Streaming achieves this through persistent volume claims (PVCs).
Scalable Pixel Streaming supports various types of shared storage solutions depending on the cloud provider you’re installing on.
Prerequisites
In order to utilise shared storage you will need to:
- Configure access to your cluster using kubectl or some other tooling software.
- Create a persistent volume claim (PVC) and then assign it to your instances
Creating PVC on CoreWeave
For an overview of storage options on CoreWeave refer to their official documentation:
Choosing your Storage Class
Important: The LAS1 region only supports premium NVMe volumes which require the storage class shared-vast-las1.
Your storage class will be based on the region you choose to deploy your application.
- Applications deployed to the
LAS1region will need to use the premium NVMe volumes which isshared-vast-las1. - Applications deployed to the
LGA1orORD1regions will need to use the standard NVMe/HDD volumes which areshared-nvme-<region>orshared-hdd-<region>.
For a list of available NVMe storage classes see All-NVMe volumes.
NOTE: The accessModes for your PVC should always be ReadWriteMany or ReadOnlyMany in order to allow the volume to be mounted to multiple nodes. For more information about access modes see Access Modes.
Writing to Volume Mounts
On CoreWeave, the ownership of the files and directories within a volume are assigned to the root user by default.
This will cause issues for the Unreal application reading and writing to the volume due to the Unreal application running as user id 1000.
To resolve the ownership issue, deploy the following job to your CoreWeave cluster, ensuring you replace the pvc-storage with the name of your PVC.
# Job to set the permissions on the volume mount

apiVersion: batch/v1
kind: Job
metadata:
  name: change-ownership-job
spec:
  backoffLimit: 1
  template:
    spec:
      restartPolicy: OnFailure
      containers:
        - name: change-ownership
          image: alpine:3
          command:
          - chown       #
          - -R          #  chown the entire folder to the user 1000
          - 1000:1000   #
          - /storage    #  Path to the mounted volume
          volumeMounts:
          - mountPath: /storage   # Path to the mounted volume
            name: filesystem-storage
      volumes:
      - name: filesystem-storage
        persistentVolumeClaim:
          claimName: pvc-storage   # Name of the pvc
Creating PVC on AWS
Scalable Pixel Streaming pre-configures storage classes for you to use on AWS. When you create a PVC, the third-party CSI drivers installed with SPS will manage the storage provisioning for you.
Creating PVC on Linux
Linux storage on AWS currently makes use of Elastic File System (EFS).
EFS supports multiple availability zones and multi-attach, this means your application instances can scale up and share the same storage volumes as necessary.
Example Linux PVC
Create a file called linux-storage.yaml with the storageClassName set to efs-sc:
apiVersion: v1
kind: PersistentVolumeClaim
metadata:
  name: linux-storage
spec:
  accessModes:
    - ReadWriteMany
  storageClassName: efs-sc
  resources:
    requests:
      storage: 10Gi
Apply the file with kubectl:
kubectl apply -f linux-storage.yaml
Creating PVC on Windows
Windows storage does not currently support multi-attach. This means that only a single Windows instance will have access to a PVC at any given time and subsequent Windows instances trying to use the same PVC will fail to schedule.
Windows storage on AWS currently makes use of General Purpose Volumes (GP3).
Windows storage only supports a single availability zone and does not support multi-attach. To use Windows storage you must enable it during installation by checking the Use Windows storage option. Keep in mind that enabling Windows storage will:
- restrict all Windows nodes to a single availability zone, and
- limit the available resources to a single instance.
Note. Given these limitations, we only recommend using Windows storage if it is absolutely necessary (e.g. where user concurrency is not required).
Example Windows PVC
Create a file called windows-storage.yaml with the storageClassName set to gp3-windows-ntfs:
apiVersion: v1
kind: PersistentVolumeClaim
metadata:
  name: windows-storage
spec:
  accessModes:
    - ReadWriteOnce
  resources:
    requests:
      storage: 10Gi
  storageClassName: gp3-windows-ntfs
Apply the file with kubectl:
kubectl apply -f windows-storage.yaml
Assign the Persistent Volume Claim to your instances
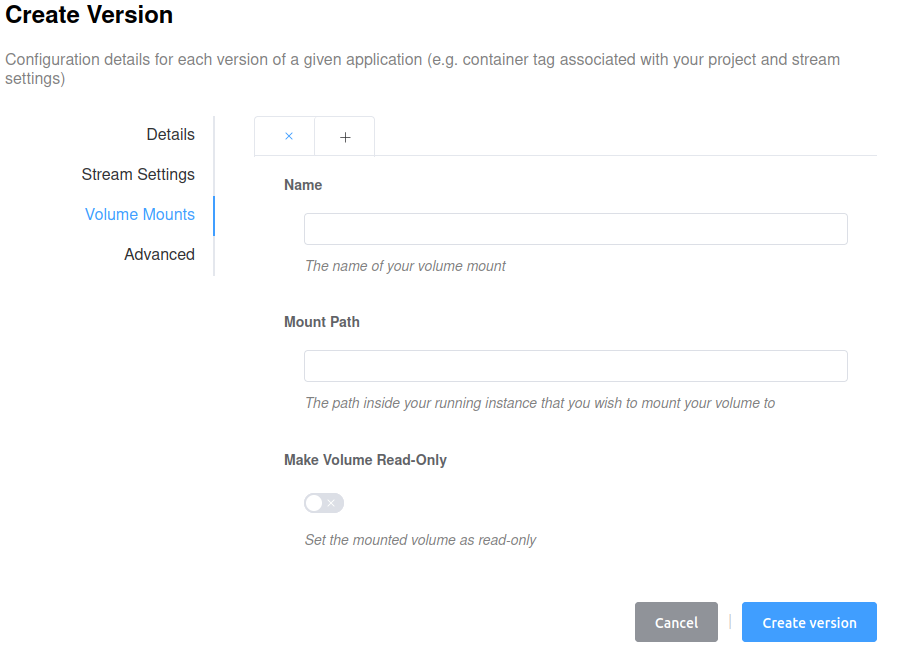
Assigning PVC via dashboard
- Open the
Volume Mountstab during the version creation step. - Enter the name of your volume mount.
- Specify the path inside your running instance that you wish to mount your volume to. The path notation will depend on the target platform of your application.
- Windows applications on AWS should mount to a directory on the
C:\drive, for example:C:\my-storage - Linux applications should mount using an absolute path, for example:
/my/storage/path
- Windows applications on AWS should mount to a directory on the
- Optionally, choose the volume to be read-only if you do not want users to be able to write into it.

Assigning PVC via CLI
To assign the PVC to your instances using the CLI tool, add the following information to the version .json file: the persistent volume claim name and the path inside the container where the file system will be mounted.
For example:
- Linux Persistent Volume Claim name: linux-storage
- Application name: volume_test
- Version Name: v1
Application.json will look like this:
{
    "name": "volume_test"
}
Version.json will look like this:
{
  "buildOptions": {
    "input": {
      "containerTag": "tensorworks/sps-demo:5.0"
    }
  },
  "name": "v1",
  "runtimeOptions": {
    "volumeMounts": [
      {
        "name": "linux-storage",
        "mountPath": "/home/ue4/record_data"
      }
    ]
  }
}
Then use these commands to create an application, a new version for it, and set it as active:
# Create the application from the .json file
sps-client application create --filepath Application.json

# Create the Version fron the .json file
sps-client version create --application volume_test --filepath Version.json

# Set the version as the active Version
sps-client application update --name volume_test --activeVersion v1
